How to Cut, Peel & Cube a Butternut Squash and Keep All Ten Fingers
Okay, I admit it. There was a time when my eyes glazed over recipes for butternut squash. My Inner Knife Phobia whispered, "How in the world would you cut one of those things safely, without losing a finger? A butternut squash is door-stop dense." It tempted, "Just go buy squash cubes at Trader Joe's. No cutting, no peeling. Who cares if they're all dry and unappetizing?"
You too? Well, you are in luck! This post illustrates, step by step, how to cut up a butternut squash. It's so easy, the squash will practically cut up itself – SAFELY. Just think of all that squash we've been missing ...
WHAT YOU'LL NEED
A cutting board
A silicone mat, if you have one
A sharp knife
A grapefruit spoon comes in handy although a fork works fine
That's all!
Well, except, yes, you'll need a butternut squash, that's one of the tan-colored squash seen in the market during the fall and winter. Let's get started.
STUMBLEUPON: For all who use the great discovery tool StumbleUpon, I'd love for this post to be 'stumbled'!
ARTHRITIS? If you're still worried about keeping all those fingers, or have trouble cutting because of arthritis or other mobility issues, it's perfectly easy to cook a whole butternut squash, see How to Roast a Whole Butternut Squash.
 First, wash the squash. Two reasons. First, wash the squash. Two reasons. If there's something yucky-gucky on the squash's skin, just cutting into it with your knife will transfer the yuck-guck to the part you will eat. And onto the cutting board where you'll be cutting up more stuff. This is called "cross contamination" – work hard to avoid it! Second, I'm going do my best to talk you into making a lovely orange-colored stock with the skins so while you're at it, get out a saucepan, willya please? |
 What, you noticed? Yes I switched squash and yes, I admit it, three squash were sacrificed, just so that you could learn how to, well, sacrifice more. It's a worthy cause. What, you noticed? Yes I switched squash and yes, I admit it, three squash were sacrificed, just so that you could learn how to, well, sacrifice more. It's a worthy cause.(UPDATE! I learned a new trick when making Roasted Butternut Squash & Apple. Before getting all fancy-pants with a knife, cook the squash in the microwave for 3 minutes. It will soften the skin and make all this extra easy-peasy!) If you have a silicone mat, put it on the counter, then put the cutting board on top, it'll slip around less. Now slice off the stem end and the other end, that's what we call the "blossom" end because it's where the squash plant's flower comes from. Yes, you've wandered into Squash Anatomy 101. |
 Off with her head! Off with her head!Slice the "neck" off the squash, that's the longer skinnier part. It's easier to work with the squash in manageable pieces. The best thing about the neck? The flesh is just a tad sweeter, a tinge smoother, than the flesh from the bulb end. Covet it! |
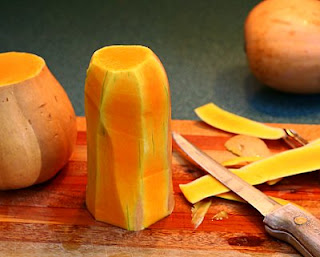 Stand the neck on its end, so, flat side down. With a knife, slice off the skin in swaths, starting at the top, slicing down. Try to take off all the skin, leaving as much of the orange flesh as possible. Stand the neck on its end, so, flat side down. With a knife, slice off the skin in swaths, starting at the top, slicing down. Try to take off all the skin, leaving as much of the orange flesh as possible.Because you'll ask: I've had no luck with vegetable peelers, even the strong y-shaped peelers, so I always use a knife. |
 Now isn't this easy? Now isn't this easy? Just slice through the neck to create pretty little rounds of squash. If you want half-inch cubes, you'll want the rounds to be about a half inch thick. If you want one-inch cubes, you'll want the rounds to be ... oh, you know. Or, just stop here. If you cut the rounds quite thin, you can cook them in a skillet or on a griddle. Just rub with a little olive oil and season with salt and pepper. They're delicious! |
 Stack two or three rounds on top of each other. No, this isn't dominoes, so no knocking the stack over. Cut through the rounds to form lengths. Stack two or three rounds on top of each other. No, this isn't dominoes, so no knocking the stack over. Cut through the rounds to form lengths. |
 Okay, if there's a tricky part, it's this. The idea is to use the fingers of your non-knife hand to hold the whole thing together while you cut the other way. It's not hard, just don't – ouch! – cut too close. Okay, if there's a tricky part, it's this. The idea is to use the fingers of your non-knife hand to hold the whole thing together while you cut the other way. It's not hard, just don't – ouch! – cut too close.Just look at all those neat 'n' tidy little cubes of squash! Aren't they pretty? |
 Enough nuzzling with the neck. Onto the bulb. Enough nuzzling with the neck. Onto the bulb. Place it cut-side down and with your knife at an angle, slice off the skin, working top to bottom. Because of the bulb's curve, I usually do the top half first ... |
 ... and then turn it over and repeat the process. Regular slashers, we are. ... and then turn it over and repeat the process. Regular slashers, we are. |
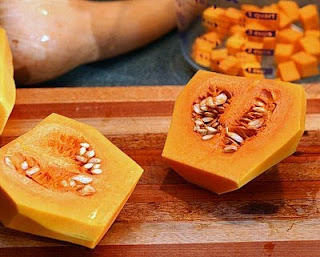 Cut the bulb in half, cutting through all the seeds and gunk inside. Cut the bulb in half, cutting through all the seeds and gunk inside. |
 Grab that grapefruit spoon – that's the one with the serrated edge and it's ever so useful to have around that I'll just wait a moment while you go buy one, okay? Back so soon? Perfect. Otherwise, just grab a fork. Grab that grapefruit spoon – that's the one with the serrated edge and it's ever so useful to have around that I'll just wait a moment while you go buy one, okay? Back so soon? Perfect. Otherwise, just grab a fork. Dig out all that stuff, using the serrated edge of the spoon or the tines of a fork. Remember the saucepan? Drop the gunk, seeds and all, plus the skins into it and cover with water. Add a bay leaf and a few peppercorns and a rib of chopped celery, maybe a carrot or onion. Let simmer for 15-20 minutes, strain and you'll have a lovely broth for soup, stews, sauces. (What, not interested in broth? Maybe Spicy Sweet Pumpkin Seeds?) |
 Place one bulb flat-side down and then cut it into lengths ... Place one bulb flat-side down and then cut it into lengths ... |
 ... and then into cubes. ... and then into cubes. |
 And now the payoff! Here's the "recipe". Toss the squash cubes with a chopped apple and a chopped onion, toss with olive oil, kosher salt and pepper and roast at 400F for about an hour, stirring every 15 minutes. Delicious! And now the payoff! Here's the "recipe". Toss the squash cubes with a chopped apple and a chopped onion, toss with olive oil, kosher salt and pepper and roast at 400F for about an hour, stirring every 15 minutes. Delicious! |
With Photos
Text Only
Still Hungry?
NEVER MISS A RECIPE!
(OR A HANDY-DANDY CUTTING GUIDE LIKE THIS)
For "home delivery" of new recipes from A Veggie Venture, sign up here. Once you do, new recipes will be automatically delivered straight to your e-mail In Box.
FAVORITE BUTTERNUT SQUASH RECIPES
~ My Favorite Winter Squash Recipes ~~ Steamed Butternut Squash ~
~ Savory Bread Pudding with Butternut Squash, Chard & Cheddar ~
~ Warm Butternut Squash & Chickpea Salad with Tahini Dressing ~
~ more winter squash recipes ~
© Copyright Kitchen Parade 2009, 2011 & 2017




I *love* that you didn't waste any part of it and used the peel, seeds and gunk to make stock!
ReplyDeleteGreat step by step photos. I usually use a peel with little fan-fare. But the knife looks pretty efficient too.
ReplyDeleteThat's exactly how I do the neck end, but for the blossom end, I just scoop out the seeds and roast in the skin. The skin comes right off after roasting, and you can mash up the flesh and freeze for later use. Like stirring into pancake batter......
ReplyDeletebetter still: poke a few holes in it and microwave until soft enough to do all the peeling, cutting, etc.
ReplyDeleteYou're my hero. I've been wrestling with butternut squash for two years, refusing to buy the pre-cut at TJ's for exactly the same reason you described. Slimy!
ReplyDeleteBut it's the broth part I admire most. Who knew? Thank you soooo much for this post!
You are wonderful! I've spent the last 40 years or so doing this the hard & scary way. This perfectly sensible method never occurred to me. Thank you!
ReplyDeleteI have never had a phobia about peeling and cutting a butternut squash. Why? Because from the time I was twelve I learned the right knife to use for the job. The almost-fillet knife you illustrated is ok to cut the skin off but is what jumps away from the squash and into your hand when doing any of the other hard work needed.
ReplyDeleteYou HAVE to use a chef's knife with some backbone or a narrow chinese cleaver style knife to be safe. Those types of knives allow you to use your free hand to guide the knife along the flat side of the blade. The skinny knife you showed has no place to do that and can wobble and cut you.
I pale when I see my wife trying to work in the kitchen with a "steak knife" to do her cutting. Get the right knife, a sharpening tool and a steel and you will have no more cutting phobia about any food.
Hello Anonymous, I had this very conversation just last night, luckily we didn't come to 'knives' over the differences. :-)
ReplyDeleteIt's my belief that we each pick knives that feel most comfortable to us. Like my favorite cook, as a man, you may well be comfortable with a larger knife with greater heft.
But as a woman, and a woman with small hands, I'm not in the least bit comfortable with a larger knife. It's too heavy for my hands, I have trouble controlling it. There are many times when because of the SIZE of what I'm cutting, a larger knife would be better. But often, even when I start off with a bigger knife, I'll switch to one that just works better in my hands.
I do thank you for chiming in, it may well persuade others to look at their knife habits.
PS All that said, I reserve the steak knifes for steaks!
But question: how do you get that super stiff residue off your ten fingers afterwards?
ReplyDeleteT ~ Residue? The 'gunk' is a little sticky, yes, but for me anyway, takes no more than a quick rinse under the faucet. Are you finding otherwise?
ReplyDeleteIf you pay attention to, and watch Rachael Ray on any butternut squash episode, you will have noticed that she always, well, almost always, mentions that the skin of the butternut squash can be eaten! Yes, eaten. That's what they do in her family and in the regions of upper New York.
ReplyDeleteIt is the only large winter squash other than summer zuchhinni, yellow crookneck and young pattypan squash that have edible skins.
I HAVE tried it, and there was no objectionable bitterness or toughness to the squash skin. If it is anything like potatoes, the most nutrients are right next to, if not in the skin.
However, the other winter squashes have a very hard skin, and those I peel with a potato peeler.
Or, if I am being lazy and want to keep ALL the nutrients in the squash instead of leaching out into the cooking or baking water, I cut a triangle 'vent' into the SEED cavity, place in a glass pie pan or microwave safe plate,then microwave the whole thing in the microwave until the skin is soft all over. If the squash has a stem or 'handle', remove it before microwaving. Depends on the size, buttercup, (the green rounded squash) can take up to 20 minutes. Go in 5-minute increments after 10-15 minutes and test for softness all over.
(And Yes, THANKS so much Alanna, for mentioning the scrubbing part of any fruit or veggie and the why they need to be washed.)
When soft, be careful, it will be hot, take out of the microwave, place on counter to cool for a short time until you can put your hand on the squash to steady it without burning your hand, and then cut into it. Remove those seeds (remember after cleaning the seeds from the flesh, save those seeds for oiling slightly, salting and baking just the seeds for a nutritious snack or for an addition to a salad.) and then using a large serving spoon, remove that gorgeous pulp from the skin to your serving bowl, upon serving, season with salt and pepper, add butter and can you go mmmmmmmmmmmmm?
Alanna, yes, just did some googling, and apparently it's a common issue. It's a very stubborn, stiff residue that leaves my fingers feeling uncomfortably tight and takes time and serious effort to remove. So now I know to just wear rubber gloves.
ReplyDeleteT ~ Fascinating! Thanks for the helpful link. There's just sooo much to learn!
ReplyDeleteGreat tutorial...I haven't had luck peeling the squash either, so a knife it is. I just baked some butternut squash last night. This has to be one of my most favorite foods!
ReplyDeleteWhat a timely post! Just a few days ago I peeled (with a vegetable peeler) both a pumpkin and a butternut squash for roasting and when I was finished I thought, "There has GOT to be a better way!"
ReplyDeleteBy the way, I get the gunky residue on my hands as well. It must just be "special" body chemistry or something.
Thanks again for a great post and recipe at the end! Squash, onion and apple sounds DIVINE!
Most often when I roast a butternut I just split it in half, scoop out the seeds, fill the holes with garlic heads and throw in the oven. The skin- while probably not great for pureed squash, is good when roasted up like that.
ReplyDelete"...and Keep All Ten Fingers"
ReplyDeleteYou know, I really (really) could have used this post LAST week. Buy stock in Band-Aid now.
Oh, don't throw the seeds into a broth. I just learned a month ago that you can toast them like pumpkin seeds, and they are wonderful. They are smaller and crisper and less "tough" than pumpkin seeds. Being smaller they only take 10 minutes to roast at 350 degrees. My daughter has been spoiled with them and won't even eat the pumpkin seeds anymore. Try it!
ReplyDeleteThank you for posting this, the info will come in handy!
ReplyDeleteI love your recipes! I have been on WW since April and lost many pounds. I turned to you for easy good recipes to change up my diet from eating the samo, samo. I made the Gingerbread muffins yesterday, which brings me to the question of how you determined that it is only 1 point per muffin, using the numbers you provides for calories and fat, and there is no fiber in them, I came up with a solid 2 points. I did not run the recipe through WW E Tools, as my internet was down from the storm we had here over the past 2 days. I have never checked behind you before, I always just tracked the points given for any of your recipes that I have tried, which have been many. Was this just an error?
ReplyDeleteThanks
Eunice
Hi Eunice ~ Aren't those gingerbread muffins great? No, it's not a mistake, it's a function of a low-fat, low-sugar and small portion size. Those mini muffins are mini!
ReplyDeleteOne other tip, especially if you're using a Weight Watchers slide tool. I've found that when I calculate points mathematically, when a serving size is on the cusp between two points, the 'slider' will look like the higher point value even while the math doesn't quite push it over.
Hope this helps, good luck with your Weight Watchers journey!
Hi Alanna - When I saw this post headline I let out a big old bellylaugh. Why? Because a few years ago I sliced an eighth-inch disk off the end of my left little finger with a chef knife (just sharpened - it went through the nail like it wasn't there). I clamped a towel on it, tucked the finger-chip in a baggie of ice and walked to the Emergency Room. After the requisite 90 minute wait an exhausted-looking young doctor went to work, cleaning and examining. While he poked and wiped he asked me in an absentminded way what I had been cutting when the knife slipped. Butternut squash, I told him. "Hmm," he said. "I never really cared for butternut squash..."
ReplyDeleteI made the recipe at the end of this post to go with last nights dinner. It was so good! Even my daughter who doesn't like butternut squash thought it was good!
ReplyDeleteGreat tips on how to peel and cut too!
LOL! this is exactly what I said yesterday... Let's just get it from Trader Joes!Ha Ha!
ReplyDeleteTHANK YOU for making it SO EASY.
great illustrative post!! so nice to know i've been doing it "right"!
ReplyDeletei don't know if this is only me, but everytime i try to peel a butternut squash-the sap really dries out my hands. Severely. i've googled it and it seems that i'm not the only one-its really odd though!!
Thank YOU!!
ReplyDeleteWow! You learn something everyday! I am going to use this method next time I make my soup!
ReplyDeleteI love Butternut Squash any way you cook it!
ReplyDeleteThanks for the info for cutting up the squash....its always been a challenge. This is definitely a big help.
Also the tip about heating the squash in the microwave for several minutes before cutting is a gem!
Thanks
Alanna,
ReplyDeleteI am a fellow veggie LOVVVER.
This post was so so so so so helpful. I will be sure to integrate your carving method into my technique repertoire.
If you haven't made something like it before, you may share my LOVE for this rich, elegant butternut cashew soup: http://theadventuresofculinarylin.wordpress.com/2010/02/24/cheese-soup/
Fantastic blog, I'm a new follower!!!!
keep up the great cooking : )
truly,
Lindsey
http://theadventuresofculinarylin.wordpress.com/
You can also add cherries/cranberries to the recipe for an added sweet treat!
ReplyDeleteCame home with a larger than normal butternut squash, only because there were no small ones left. I Googled "cut butternut squash" and in less than 30 seconds I was a pro. My squash is happily baking away with some olive oil. And since my windows are open the smell is wafting into the neighborhood. THANK YOU also for standing up for woman with small hands everywhere... Those big man knives are unwieldy. I will be so looking over the rest of your site!!!
ReplyDeleteWent to a produce stand yesterday and got all excited by a huge butternut squash. Though I've never cooked one, I had images of butternut squash soup dancing in my head and bought it. Today, I realized, "What have I done?!" and Googled how to cut one in a panic. Came across your site and now, 20 minutes later, my squash is cubed and ready for soup! I wasn't even intimidated after reading your post. Thanks!
ReplyDeleteThanks for the great post!! I picked up a couple of squash today to try a butternut squash soup recipe. Seemed like a great idea, but then I got home and had no idea what to do with the silly shaped vegetable. Your instructions worked perfectly!!
ReplyDeleteIn New England where we grow lots of butternut squash, peeling is easy. Just cut the squash into rounds with the skin on. Each round is manageable with your favorite knife to get under the skin and peel around sort of like you would peel an apple. When you get to the seeds, scoop out with a spoon. So simple.
ReplyDeleteThank you! Now, just to get that grapefruit spoon! :)
ReplyDeleteWonderful little post, many thanks. I never thought of splitting it at the neck, amazing how we sometimes can't see around the most difficult things.
ReplyDeleteMy stock turned out great too :)
Brilliant! Both the cutting method and the broth. Thanks so much for the tips. I'm so excited about the broth idea and have never had such an easy time cutting a butternut squash.
ReplyDeleteThank you for these step by step photos. Mine look just like yours on the baking sheet! I am making a recipe for Wild and Brown Rice Pilaf with Butternut Squash and Dried Cranberries and will link your page to my recipe to explain how to cut the butternut squash. Thanks again!
ReplyDeleteThe microwave tip worked like a charm! Thanks! I started off cutting it like your photos, but then I found a vegetable peeler was much faster and easier. Give it a try! :)
ReplyDeleteCait posts up higher in this thread that butternut squash skin is edible - this I've never heard - but she states that this is the only large Winter squash skin that is edible. I disagree, Kabocha (Japanese pumpkin)very definitely does not need to be peeled! One of the many reasons I love Kabocha. Kind of tastes like chestnuts, yummy, and not a pain in the fanny to prepare...
ReplyDeleteExcellent, Thank You
ReplyDeleteThat was exactly what I was looking for.
Thank you so much for this! I volunteered myself to make a squash casserole and low and behold I had no idea how to cube squash. This was perfect and the pictures were so helpful!Thanks again!
ReplyDeleteLove your writing - the "nuzzling with the neck" was genius!
ReplyDeleteNever thought of using the peelings for broth (also genius!). Gonna try the microwave 1st method. I used to tap a butcher knife with my "kitchen rock" to get it through the squash...
I'm going to try the spiced pumpkinseed recipe with my squash seeds, but bake them to dry them. I usually boil them in heavily salted water, then toast on a baking sheet till they start "popping". Also, in case one doesn't choose to use the seeds for people-food, the raw seeds are MUCH appreciated by squirrels!
Thanks you so much for all the creativity you put into this - I enjoy you and your writing, AND use the recipes!
THANK YOU!! This was extremely helpful. ~Love from the clueless vegan teen who's learning to cook~ (◕‿◕✿)
ReplyDeleteMy daughter just sent me a recipe for butternut squash soup that sounds delicious, but she says she "fights with" the squash to get it prepared, and I have arthritis in my hands, so your article was very welcome . Thank you - I will pass on the info to my daughter.
ReplyDeleteThe microwave tip turned a back and bicep breaking workout with squash into a TOTAL breeze. I can't believe I hadn't thought of that before. Thanks!
ReplyDeleteYour photo series on how to cut up a butternut squash (and keep all ten fingers) is brilliant. I didn’t even need to read the notes.
ReplyDeleteExcellent tips here! Just wanted to add, I like to dice up sweet potatoes, and mix it with the squash (instead of apples and onions, although i'm eager to try that option now too!). Toss the potatoes and squash in a ziploc bag with olive oil, salt and pepper, and some cinnamon and sugar, then bake. My kids love it!
ReplyDeleteThis comment has been removed by a blog administrator.
ReplyDeleteThis comment has been removed by a blog administrator.
ReplyDeleteThis comment has been removed by a blog administrator.
ReplyDeleteThis comment has been removed by a blog administrator.
ReplyDeleteThis comment has been removed by a blog administrator.
ReplyDeleteThis comment has been removed by a blog administrator.
ReplyDeleteThis comment has been removed by a blog administrator.
ReplyDeleteThis comment has been removed by a blog administrator.
ReplyDeleteThis comment has been removed by a blog administrator.
ReplyDeleteThis comment has been removed by a blog administrator.
ReplyDeleteThis comment has been removed by a blog administrator.
ReplyDeleteThis comment has been removed by a blog administrator.
ReplyDeleteThis comment has been removed by a blog administrator.
ReplyDeleteI made this and loved the combination...I did sprinkle a little sweet smoked paprika on them with the sea salt and fresh ground pepper.
ReplyDeleteThanks for the tips! I use a big knife for control and have small hands, but to each his own. I love the apples/onion idea. The stiffness on your hands is because the skin of the squash is caustic to some - my hands actually start pealing and for some it burns, so I use an old plastic bag over my hand to touch the squash.
ReplyDelete