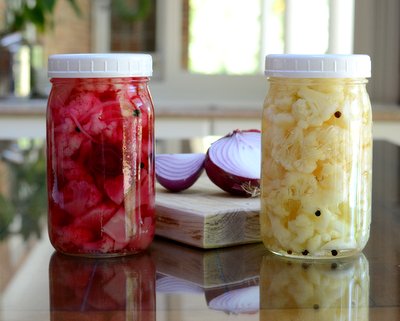
Cauliflower Refrigerator Pickles ♥ No Canning Required
Real Food, Fresh & Flexible. Budget Friendly. Great for Meal Prep. Low Carb. Low Fat. High Protein. Weight Watchers Friendly. Not just vegan, Vegan Done Real. Naturally Gluten Free.
The Short Version: How to Pickle Cauliflower
Cut a cauliflower head into bite-size florets and boil just until beginning to soften, then drain and pack into jars along with slivers of onion and peppercorns. Fill the jars with a hot pickling liquid (vinegars, water, salt and sugar, exact amounts in the recipe below), submerging the vegetables completely. Cover and refrigerate for 24-48 hours before eating.Pretty in Pink!
So if we have Those Pink Potatoes and That Pink Salad, why not These Pink Cauliflower Refrigerator Pickles? LOL, people.Actually, the pink here is entirely optional if decidedly pretty. Once I experimented with capturing the beautiful pink, purple and magenta colors in Easter Egg radishes. (Thanks to reader Snowpea for the identification!) Instead, like a stray red sock that gets into a load of white, the cauliflower "sheets" turned pink. Oh well, they still "slept" just fine.
So I switched from radishes to a sliver of raw beet. Perfect color! No beet taste! Cauliflower dyed pink with beet it is from here on!
Fridge Pickles vs "Canned" Pickles
There are two kinds of pickles that home cooks tackle. Each method has its place but for beginners, fridge pickles are a great introduction.FRIDGE PICKLES are sometimes called "quick" pickles because they require only a three-step process. (1) Prep the vegetables by cleaning plus cutting to size and some times (but not always) briefly cooking before packing into clean jars. (2) Bring vinegar, water, salt, sugar and other flavorings to a boil and pour over the vegetables. (3) Cover and let "pickle" right in the fridge!
Fridge pickles are especially good for small batches, just to keep some fresh pickles on hand for near-term eating. If you have limited fridge space, refrigerator pickles are a smart choice, just make a jar or two at a time.
CANNED PICKLES, in contrast, are prepared using special jars, lids and other equipment so that the pickles may be safely sealed and stored without refrigeration for a couple of years. (1) Prep the vegetables, cooking and seasoning according to the recipe and pack into sterilized canning jars. (2) Bring vinegar, water, salt, sugar and other flavorings to a boil and pour over the vegetables. Attach special lids and rings to the jars. (3) Bring a large kettle of water to a boil and submerge the jars in the water for a specified period of time. Let cool and wait for the "pop" sounds that indicates that the jars have safely sealed. (4) Store the jars in a cool place until ready to eat. Once the jar is opened, it must be refrigerated.
Canning is the better choice when you have a big volume of vegetables or fruits to preserve. But canning is a more complicated process. It isn't hard but it does take dedicated time and coordination and attention. Even long-time experienced canners nearly always follow canning recipes from trusted sources.
RESOURCES
FRIDGE PICKLES I do adore fridge pickles! Just look at these, all refrigerator pickles! peppers & cucumbers + Brussels sprouts + beets + red onions + carrot & daikon + bread & butter pickles + Kool-Aid pickles + bell peppers + asparagus + mixed veggies + even more Refrigerator Pickle recipes.CANNED PICKLES But every so often, I drag out the canning gear from the basement and spend the day on a canning project. One year, I canned something new every day for weeks, then I wrote Practical Home Canning Tips for both new and experienced canners.
Then? Sure, try your hand at Kitchen Lesson: How to Make Rhubarb Jam & Rhubarb Jelly + Homemade Zucchini Relish + Ripe-Tomato Relish with Peaches & Pears (Sharon's Pickle).
Canning Supplies for Refrigerator Pickles
Good news, nothing special is needed for refrigerator pickles, no special canning jars, no special canning lids, no big tub for hot water baths. In fact, you can even re-use glass jars (you know, the ones from spaghetti sauce, etc.), so long as the lids are in good shape.That said, wide-mouth quart canning jars (also called "Mason jars") are so very handy! I use them for everything from chicken stock to oatmeal to dried beans to refrigerator salads to ... you get the idea. i also use wide-mouth pint jars for yeast, nuts, sauces, etc. It pays to fix on either regular-width mouths or wide-mouths, that way the lids are interchangeable.
For these storage uses (versus actual "canning"), there's no need to use the metal lids and rings that come with the jars, although you can. Instead, I buy one-piece plastic canning jar lids (affiliate link) that go in the dishwasher. Very handy ...
Cauliflower Refrigerator Pickles
Hands-on time: 30 minutes
Time to table: 48 hours
Makes 8 cups pickles (2 quart jars)
Time to table: 48 hours
Makes 8 cups pickles (2 quart jars)
CAULIFLOWER
1 large head cauliflower
PICKLING LIQUID
1 cup unseasoned rice vinegar
1 1/2 cups white wine vinegar
1 cup water
2 tablespoons kosher salt (or if you're using table salt, maybe a tablespoon)
4 tablespoons sugar
FOR EACH JAR
Cooked Cauliflower
A few thin slivers or onion
3 whole peppercorns
1 thin slice of raw beet, optional, for pink pickles only
1 clove garlic
CAULIFLOWER Put on a large kettle of water to boil, cover it to retain heat and prevent evaporation. Wash and trim the cauliflower. Cut it into bite-size florets of roughly equivalent size. When the water boils, drop in the cauliflower and let cook for 2 - 3 minutes, until just barely done if you want crunch (recommended), longer if you want something softer. Let the cauliflower drain in a colander.
PICKLING LIQUID Bring all the ingredients to a boil in a saucepan, make sure the salt and sugar both dissolve.
FOR EACH JAR Layer the Cooked Cauliflower, onion, peppercorns and beet (if using) in the jar. Place the garlic clove on top, easily accessible. Cover with the hot Pickling Liquid into the jars, covering all the cauliflower, pressing a bit if necessary to submerge. Cover and refrigerate.
NOW WAIT Keep the jars in the refrigerator, these jars have not been "canned" to safely seal the jars for storing at room temperature. After 24 hours, pull out the garlic. At first, the pickles may still seem a bit harsh and vinegary but after several days, the flavors mellow out and become quite wonderful.
EAT UP! The pickles should be consumed within a couple of months.
ALANNA's TIPS & KITCHEN NOTES
Still Hungry?
NEVER MISS A RECIPE!
For "home delivery" of new recipes from A Veggie Venture, sign up here.Once you do, new recipes will be automatically delivered straight to your e-mail In Box.
Quick! Quick! Quick! More Recipes With These Ingredients
cauliflower recipesMore Favorite Refrigerator Pickles
~ Winter Tomato Salad (Quick Pickled Vegetables) ~~ Quick Pickled Asparagus ~
~ Homemade Bread & Butter Pickles ~
~ more Refrigerator Pickle recipes ~
from A Veggie Venture
~ Pepper & Cucumber Refrigerator Pickles ~
~ Marinated Brussels Sprouts ~
~ Refrigerator Pickled Beets ~
~ more Jams, Pickles & Preserves ~
from Kitchen Parade, my food column
Seasonal Eating: Early Summer Across the Years
Rhubarb Bakewell TartLooking for healthy new ways to cook vegetables? A Veggie Venture is home to hundreds of super-organized quick, easy and healthful vegetable recipes and the famous asparagus-to-zucchini Alphabet of Vegetables. Join "veggie evangelist" Alanna Kellogg to explore the exciting world of common and not-so-common vegetables, seasonal to staples, savory to sweet, salads to sides, soups to supper, simple to special.
© Copyright Kitchen Parade
2007 & 2020 (repub)
© Copyright Kitchen Parade
2007 & 2020 (repub)


I bought a cauliflower yesterday at the market that really is tinged with pink. I have no idea why. Maybe it was sat next to the radishes. Or maybe it really is pink.
ReplyDeleteThat's an adorable plate. I do believe some cauliflower grows pink.
ReplyDeleteLove the stray red sock. Ain't it the truth!
ReplyDeleteWho needs those expensive orange and purple cauliflowers when you can just make your own!
ReplyDeleteSam ~ Next to radishes :-)
ReplyDeleteKelly ~ I'm imagining it next to the purple ones. Girlie Cauliflower!
Christine ~ Thanks! And you get major points for finding the finer points ...
Joe ~ Orange, that's a new one for me!
All ~ I find it funny that what I viewed as a 'negative', the pink color, is what's caught everyone's attention. As always, thanks for stopping in and commenting!
I would caution that when water bathing, you must sterilize your jars thoroughly! Most dishwashers today have a sterilizing option and that works just fine. For years, I filled my jars with water and put them in the water bath pan and brought the whole kit and caboodle to a boil while I prepared my fruit/tomatoes/pickles. When ready to load the jars, I use my lifter to pour the water down the drain then carefully fill my jars, etc. My method allows the jars to be sterilized and also gives me the correct water level for processing my jars. Hope that helps those who are new to food preservation.
ReplyDelete